


Sourdough Starter 101
Sourdough starter is the cornerstone of every sourdough bread, and understanding it is crucial for successful baking. Whether you're stepping into the world of sourdough baking for the first time or seeking to elevate your existing skills, a deep understanding of your sourdough starter is crucial. Have you ever wondered how often you should feed your starter to keep it at its best? Or perhaps you've encountered the term "seed ratio" and are curious about its impact on your starter's health and activity. We'll address these questions and more, unraveling the science and art behind maintaining a healthy and active sourdough starter.
Ready to demystify the art of the sourdough starter? Continue reading to unlock the answers to your starter questions.
A sourdough starter is a fermented mixture of flour and water that is responsible for the leavening and flavor profile of sourdough bread.
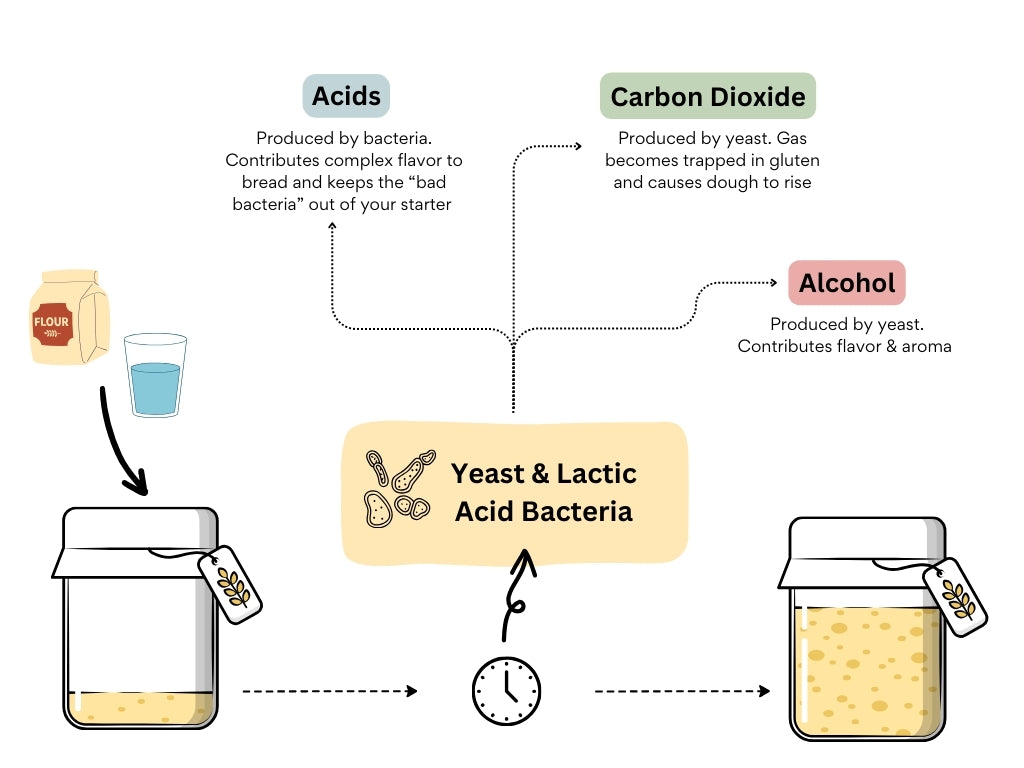
Although it begins as a simple mixture of flour and water, with time, transforms into a thriving community of microbes. Wild yeast and lactic acid bacteria exist in the environment all around us: in flour, the air, and even on our hands. Over time, they take up residence in the mixture of flour and water and feed on the starch in flour. Through the fermentation process, they produce three main by-products: carbon dioxide, acids, and alcohol. Carbon dioxide causes sourdough bread to rise, while acid gives sourdough its distinctive flavor and prevents harmful bacteria from growing. Alcohol contributes to the flavor and aroma. Because a sourdough starter is a living culture, it must be fed frequently with a fresh food source (flour and water) to keep it alive and healthy.
Sourdough starters require regular feeding with flour and water to keep the culture of microbes alive and active. An active starter is crucial for making good sourdough bread.
Feeding the starter provides fresh nutrients for the microbes. The microbes consume the starch in the flour and use the energy obtained to multiply, increasing their population. Once the food source is used up, the microbe populations begin to decrease, and the microbes become hungry again. At this point, it's necessary to refresh the starter with flour and water.

If the starter is not fed, the by-products produced during fermentation will build up. Without regular feedings, fermentation by-products accumulate, making the starter overly acidic. Over time, a layer of dark liquid called "hooch" will form on top, which is alcohol, creating an undesirable environment for the microbes.
We recommend starting with unbleached bread or all-purpose flour, as it's readily available and commonly found in most kitchens.
However, the world of sourdough is flexible and adventurous. Whole wheat and rye flour are excellent choices, too, either on their own or mixed with all-purpose or bread flour. If you wish to switch the type of flour you use, there is no need to start a new starter from scratch. Simply start feeding your starter with the new flour. Some bakers prefer a gradual transition, slowly increasing the proportion of the new flour over several feedings. This can help the microbial community in your starter adjust slowly. You may notice your starter behaves slightly differently with different flour.
Different flours impact the starter's activity. Whole grain flour, rich in nutrients for the yeast to feed on, can encourage more fermentation activity, and the starter will ripen faster. If you want to boost a sluggish starter, consider replacing about 10% of your flour weight with whole wheat or rye flour. For example, if you normally feed your starter 50g of bread flour, switch to 5g of rye and 45g of bread flour.
Yeast is the essential ingredient that makes bread dough rise. It can be introduced into your dough in two ways: through packaged yeast or wild yeast found in a sourdough starter.
Packaged yeast, consisting of cultivated yeast strains, is designed for quick and consistent fermentation. It's a popular choice for bakers seeking convenience and uniform results.
In contrast, a sourdough starter utilizes wild yeast and lactic acid bacteria, both naturally present in the environment, for a more gradual fermentation process. This not only leavens the dough but also contributes a distinctive tangy flavor and aroma unique to sourdough. Furthermore, sourdough's slower fermentation allows for the development of deeper flavors and textures, unattainable with commercial yeast. This method also extends bread's shelf life due to the acidic environment that naturally preserves the loaf.
While using packaged yeast simplifies the baking process, creating sourdough requires maintaining a starter, embodying a more engaged approach to fermentation. Both methods have their merits, providing bakers with a range of flavors and textures. Ultimately, choosing between using packaged yeast and cultivating a sourdough starter depends on personal preference, baking goals, and the unique qualities bakers wish to bring to their bread.
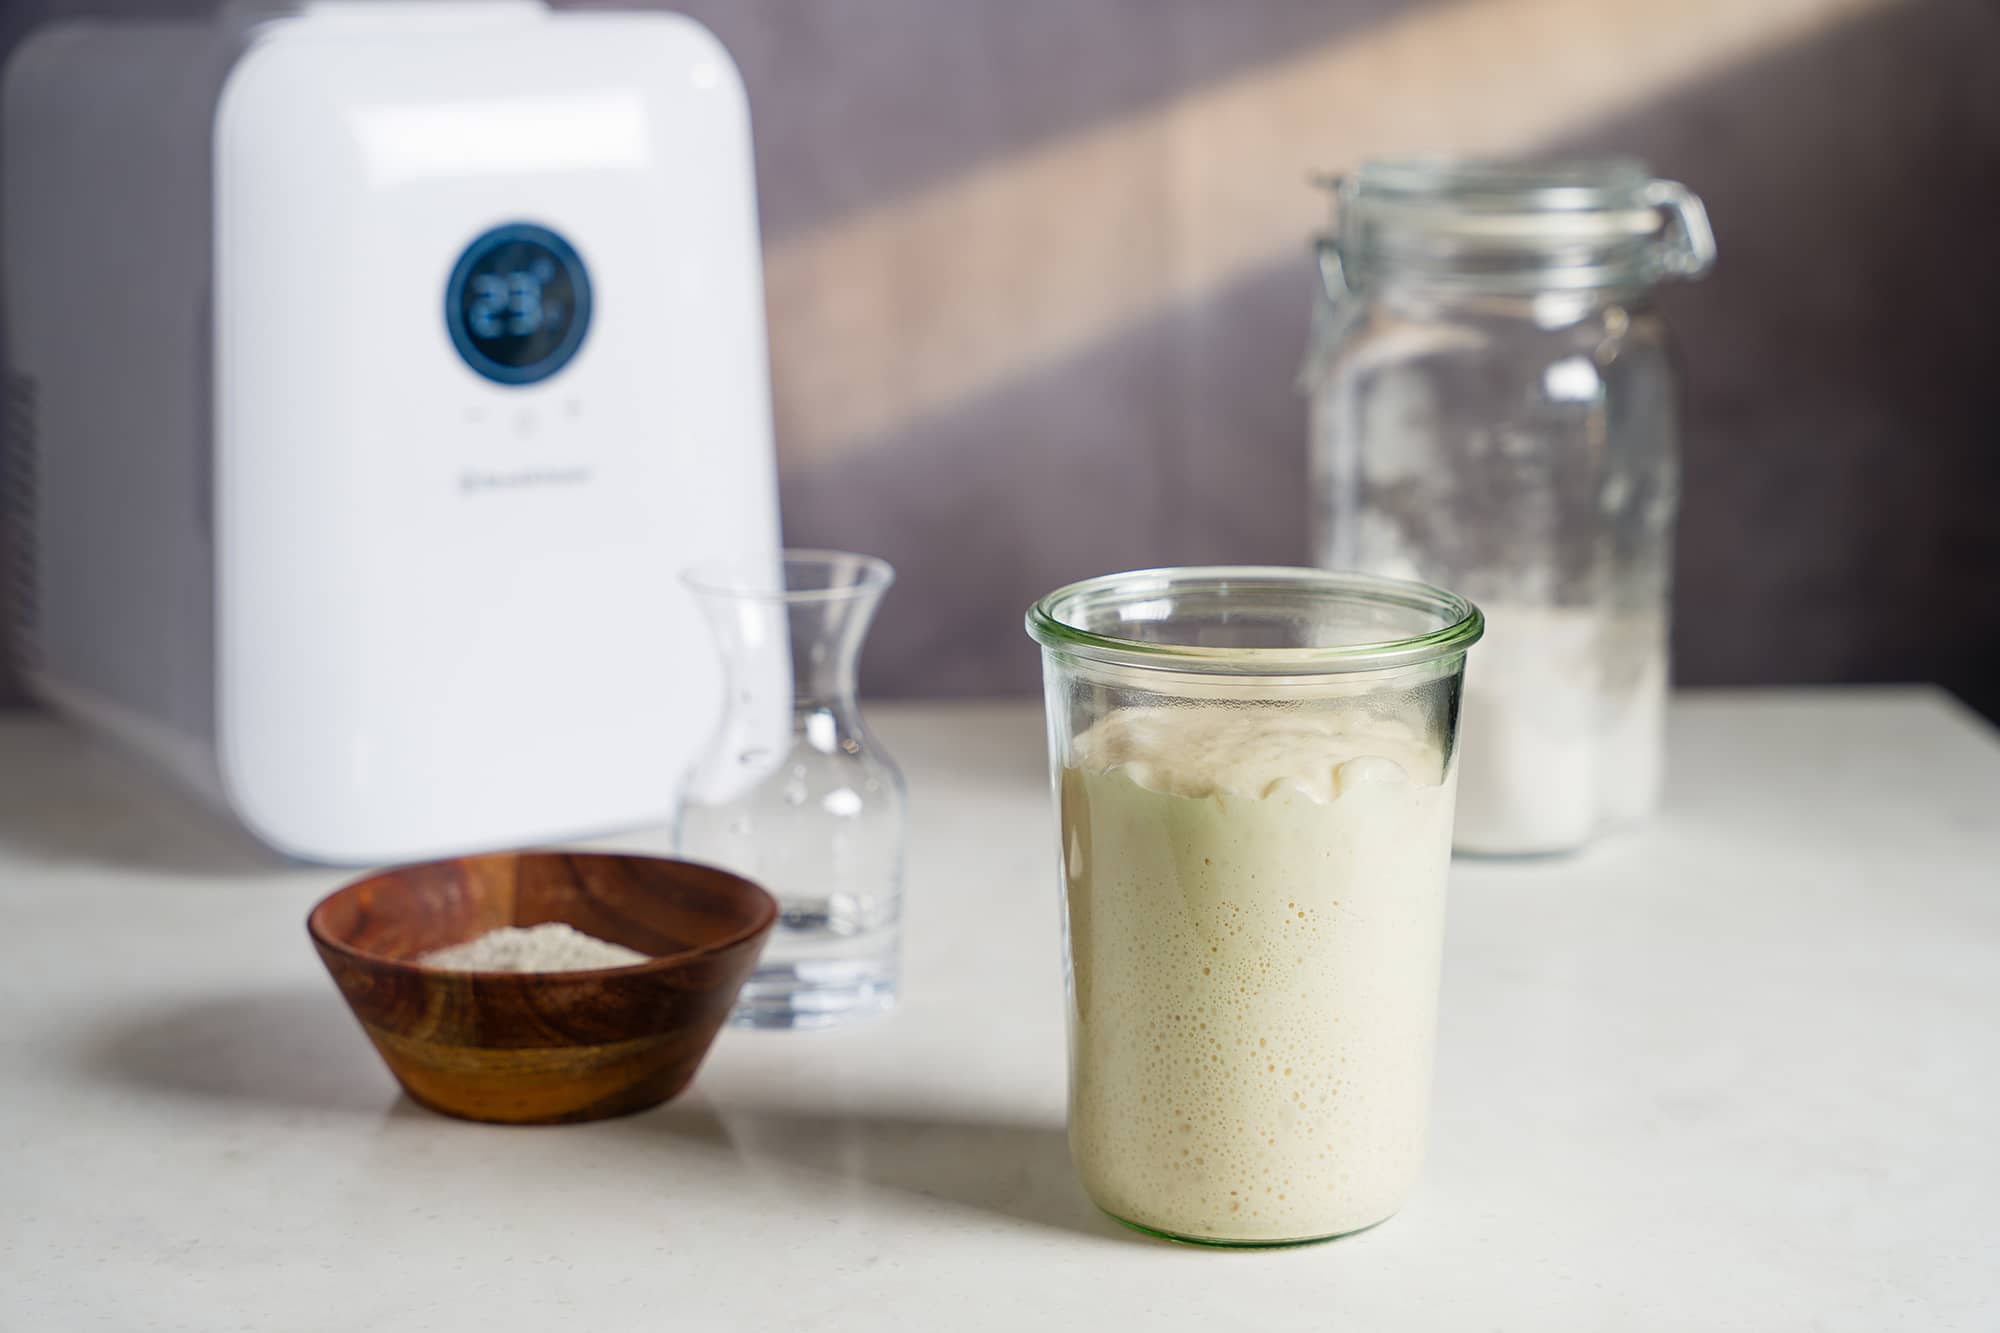
Creating a sourdough starter is a rewarding journey into bread-making, and precision is key. We recommend using a kitchen scale to weigh ingredients, as this is the most accurate method, ensuring consistency in your baking. Cups and spoons can vary, but grams never lie, making this professional practice easy and beneficial for home bakers too.
Starting Your Sourdough Starter:
All you need is flour, water, and a warm spot for your starter. Patience is crucial; it typically takes around two weeks for a starter to mature enough for baking. For those eager to begin baking sooner, consider sourcing a portion of mature starter from a fellow baker. Follow our guide for creating a starter from scratch for a detailed guide, or read below for an abbreviated guide.
Quick Start Guide:
- Day 1: Mix 30g flour with 30g water in a jar. Cover loosely and place at 78°F (26°C) for 24 hours.
- Day 2: Stir the mixture without feeding and return to 78°F (26°C).
- Day 3-14: Each day, start by removing 30g of the previous day's mixture and discard the rest. Mix the reserved 30g with 60g of flour and 60g of water. Keep at 78°F (26°C), loosely covered.
By the end of two weeks, your starter should double or triple in size reliably every 5 to 6 hours, with a web-like texture and plenty of bubbles. If it’s not quite there, continue daily feedings until it shows these signs of readiness.
Sourdough discard is the portion of the starter that you remove and do not include in the next feeding cycle. When you refresh your starter by adding fresh flour and water, only a portion of the existing mature starter is retained to ensure the starter remains active and at a manageable size. The excess, known as the discard, can either be used in various recipes, like delicious Sourdough Raspberry Chocolate Chip Cookies, or composted if not needed.
When refreshing your starter, a portion of the mature starter is saved and mixed with fresh flour and water. A portion is removed and discarded for two reasons- to keep your starter at a reasonable size and to keep your starter healthy.
Every time you feed your starter, you add more flour and water. Without discarding, you'd soon have more starter than you could manage or use, leading to unnecessary waste and potentially a very large container of starter!
For example, you feed your starter a 1:1:1 ratio:
→ Starter feeding: 50g starter + 50g flour + 50g water = 150g starter
Keeping the same feeding ratio, if you do not use or discard any of the starter, you will quickly have a very large amount.
→ The 150g of starter you have will now need to be fed 150g flour and 150g water = 450g starter
You can see where this is going.
Why not just keep the amount of flour and water consistent at each feeding?
As the amount of starter increases, if the amount you feed stays the same, the food source will not be large enough to sustain the microbes. Your starter will become weak and overly acidic. It may look soupy, and you won't see a lot of bubbles, and it won’t give you good results when baking.
Creating a sourdough starter from scratch requires patience and consistency. While some starters become active within two weeks, it's not uncommon for it to take longer, so try not to become discouraged and continue with the feedings for a few more weeks. If your starter isn't showing much activity, these recommendations may help:
Temperature: New starters must maintain a warm environment around 75-80°F (24-27°C) to encourage growth. The Sourdough Home or Folding Proofer can be an ideal spot for your starter. If your environment is too cold or warm, the wild yeast and lactic acid bacteria will struggle to grow, and you will not have a healthy starter.
Feeding Frequency: Follow the feeding instructions for creating a sourdough starter as closely as possible. Missing a feeding isn't catastrophic, but try to stay on track as much as possible.
Type of Flour: Only use unbleached flour, as bleached flour has been processed with chemicals that leave it devoid of beneficial nutrients. Whole grain flours like whole wheat or rye are more nutritious for the yeast and bacteria in your starter, leading to more activity. If your starter needs a boost, try substituting anywhere from 25 to 50% of your regular flour with rye flour for a few feedings.
Water Quality: The chlorine in tap water can impede the growth of yeast and bacteria in your sourdough starter. If your starter is struggling, switch to filtered or bottled water (avoid distilled water, as it lacks the minerals needed by the yeast) for a few feedings. Once your starter becomes active and established, it should be resilient enough to tolerate tap water again.
Discarding: Although discarding a portion of your starter starter might seem wasteful, it's crucial to maintain a healthy microbial balance. Do not skip this step. Once your starter is established, you can find methods to reduce the amount of discard created.
Cleanliness: Maintaining cleanliness is key to preventing unwanted microbial competition in your sourdough starter. Ensure your tools and containers are clean to avoid any potential issues. Mixing your starter in a small bowl before transferring it to a clean jar can help maintain a clean environment. If you prefer mixing directly in the jar, make sure no residue is left on the sides where unwanted microbes might thrive.
It’s common to see an initial burst of activity in your sourdough starter around days 4 or 5. This can be exciting as you might notice your starter becoming bubbly and even observe traces on the sides of your jar indicating that it rose overnight. However, if this activity suddenly slows down or seems to stop, don't worry—this is normal!
During the early days, your starter is populated by various yeasts and bacteria, some of which are not the ones we want for a thriving sourdough culture. The initial burst is often due to these less desirable microbes. As you continue feeding your starter, the more robust, desirable yeast strains and lactic acid bacteria begin to establish themselves and eventually dominate the culture.
Keep up with your regular feeding routine, maintaining the right temperature and consistency, and your starter will stabilize and become consistently active, ready for baking.
Reducing discard not only minimizes waste but also saves money and fridge space. Two effective strategies are maintaining a smaller starter quantity and lengthening the time between feedings.
Many beginners unintentionally keep more starter than needed, following initial recipes that call for large amounts. Opting for a smaller starter volume has several advantages—it's simpler to manage, occupies less space, and reduces flour usage, thereby saving money.
Feeding Example:
- Start with 5g of your existing starter.
- Add 20g of flour and 20g of water.
- After mixing, you’ll have 45g of fresh starter.
For the next feeding, use just 5g from this batch, and decide what to do with the remaining 40g. This small quantity makes it easier to manage discard, either by using it in recipes or disposing of it with less waste.
Building Up for Baking:
If you need more starter for a recipe, adjust the feeding before baking to accumulate the desired amount. Simply discard less of your starter and increase the amounts of flour and water added.
- For example, 6 - 8 hours before baking, your feeding might be: 30g of starter + 120g of flour + 120g of water which will yield 250g of ready-to-use starter.
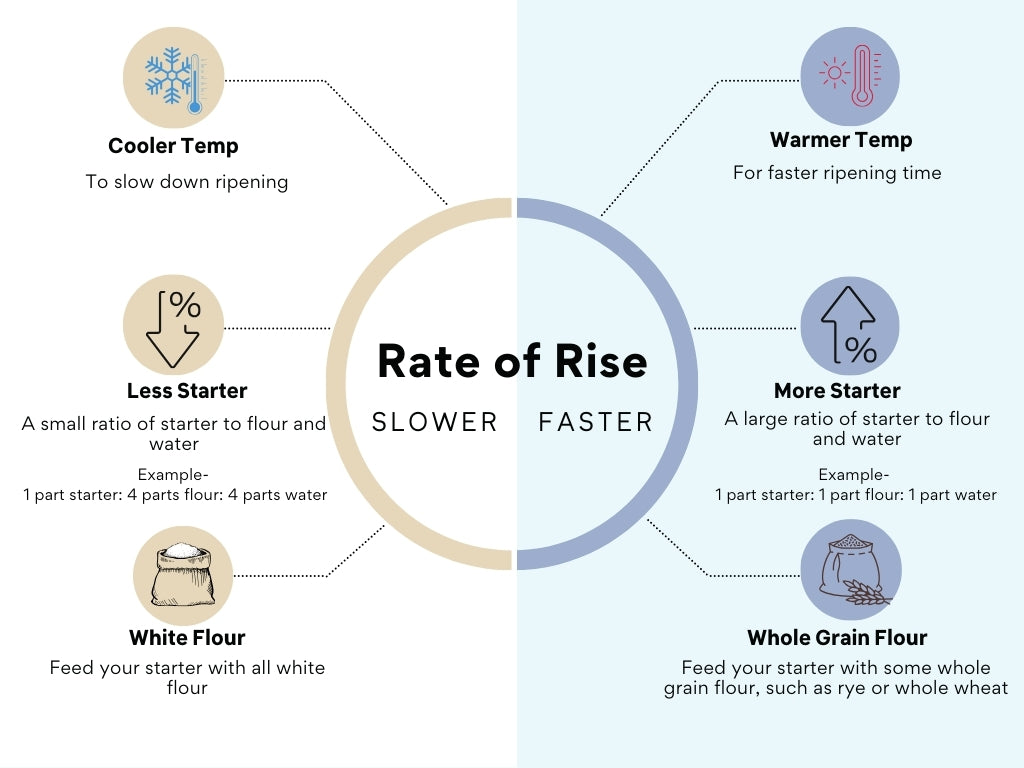
The rate at which your starter ripens depends on its temperature and the ratio of and the feeding ratio.
- Temperature: A cooler environment slows down the starter’s activity, reducing the need for frequent feedings. Storing your starter in a cooler environment can help extend the time between feedings.
- Feeding Ratio: Using a smaller seed ratio (the amount of starter you begin with) can also slow the starter’s consumption of its new flour and water, further spacing out feeding times.
By adjusting these factors, you can find a balance that maintains your starter's health with minimal discard.
When refreshing your starter, you carry over some of the mature starter and either discard or use the rest. The carryover is known as the “seed,” which will introduce the microbe population into the new feeding.
Bakers use the term "seed ratio" or "feeding ratio" to refer to the proportion of sourdough starter, flour, and water used when feeding the starter. It is important to note that the ratio is based on weight, not volume.
Seed ratios are expressed in three numbers: the first for the starter, the second for flour, and the third for water. For example, a 1:1:1 ratio means using equal parts (by weight) of starter, flour, and water.
Examples of 100% Hydration Seed Ratios:
- 1:1:1 Ratio → 50g starter, 50g flour, 50g water
- 1:2:2 Ratio → 10g starter, 20g flour, 20g water
- 1:4:4 Ratio → 30g starter, 120g flour, 120g water
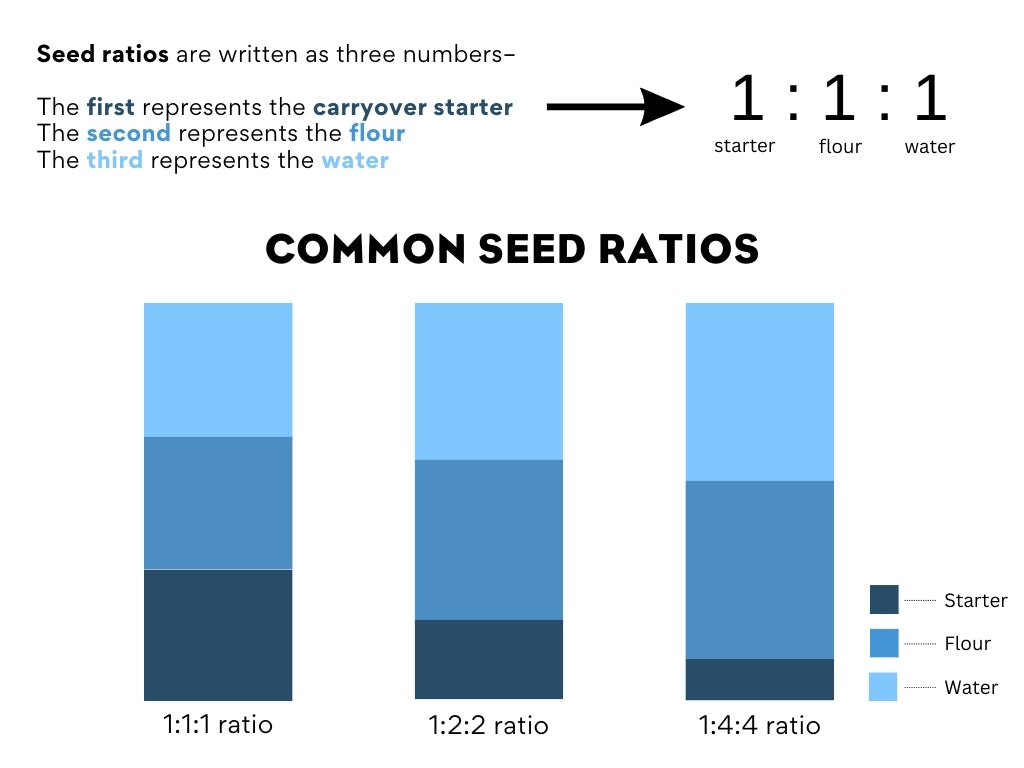
The seed ratio affects the ripening speed of your starter. A higher proportion of starter to flour and water (e.g., 1:1:1) will ripen faster than a lower proportion (e.g., 1:5:5), assuming the starters are kept at the same temperature. Adjusting this ratio allows bakers to control the starter's activity level and readiness for baking.
Below, the focus is on feeding and maintaining an established sourdough starter, not its initial creation. For beginners forming a new starter, please adhere to specific startup instructions.
When maintaining an established sourdough starter, selecting the correct seed ratio—how much flour and water you add relative to the amount of starter—is key. This decision significantly impacts how quickly your starter becomes ripe and ready for baking. While various ratios can be successful, identifying one that aligns with your schedule and promotes a healthy starter is crucial.
Understanding Ratios: A Quick Guide
- Higher ratios (e.g., 1:4:4 and above) offer more food for the microbes, extending the time between feedings and easing maintenance.
- Lower ratios (e.g., 1:1:1 or 1:2:2) provide less food, requiring more frequent feedings.
Our Recommendation: For routine maintenance, we prefer a 1:4:4 ratio. This ratio promotes a vigorous starter with extended feeding intervals, ideal for most bakers.
Considerations for a 1:1:1 Ratio: Although quick to ripen and useful when your starter needs to be ready soon, we advise against using a 1:1:1 ratio regularly. It demands frequent feedings—potentially several times daily—which can be impractical. Often, bakers don't refresh their starters often enough, leading to a "starved" state and an overly acidic environment, which can negatively impact the health and vigor of your starter. While not inherently problematic, the practical challenges of maintaining this ratio make it less suitable for everyday use.
Misconceptions About Higher Ratios: A common misconception is that higher ratios necessitate more flour. In reality, you can maintain your desired starter volume regardless of the feeding ratio. Adjusting the amount of starter carried over into the next feeding can keep the total volume manageable.
For example, transitioning from 1:1:1 to 1:4:4 doesn't require quadrupling ingredients; starting with 5g of starter plus 20g each of water and flour totals 45g.
Transitioning from 1:1:1 to 1:4:4 doesn't require quadrupling ingredients
* Normally 1:1:1 feeding → 20g starter, 20g flour, 20g water = 60g total
* New 1:4:4 feeding → 7g starter, 28g flour, 28g water = 63g total
You can see the ratio has been changed, but the amount of starter is practically the same.
Key Takeaways:
- Opt for a 1:4:4 feeding ratio for a low-maintenance, healthy starter.
- Avoid the routine use of a 1:1:1 ratio to prevent over-acidity.
- If you do not want to increase the amount of starter one hand, adjust the starter quantity, not the flour and water, when changing ratios.
The ideal time to use your starter for baking is when it is ripe or shortly thereafter. Doing so will ensure the yeast and bacteria populations are at their height and fermentation activity is strong. Some bakers may also refer to this as a mature starter or using a starter at peak.
The length of time between feeding your starter and when it is ripe depends significantly on the temperature and feeding ratio. Whether it takes 5 hours or 10 hours, the signs of readiness will be the same.

Use these signs to identify a ripe starter:
- Size: There will be a noticeable increase in volume. Some bakers look for double the volume, but a healthy and active starter will triple in volume when ripe.
- Bubbles: You should see plenty of bubbles on both the sides and top of the jar.
- Aroma: A ripe starter will have a slightly sour and yeast aroma.
- Texture: If you scoop out a spoonful, it will seem light, a bit loose, and airy. The texture will be more web-like than stiff and doughy.
- Dome: When the starter reaches its peak, the top will initially be domed, showing vigorous activity. As it begins to exhaust its food supply, the dome may flatten or even sink slightly, indicating it’s just past its peak but still usable.
Familiarize yourself with your starter's behavior—its rise-and-fall cycle and appearance at various stages. After feeding, mark the starting level on your jar with masking tape or a rubber band. Observe how high it rises, taking note of the time, seed ratio, and temperature. By closely observing your starter and understanding its lifecycle, you can pinpoint the optimal time for baking, ensuring your bread has the best possible rise and flavor.
Hydration in a sourdough starter refers to the ratio of water to flour by weight, expressed using what's known as baker's percentage. With this method, the weight of the flour is always set at 100%, and the water weight is compared to this.
Bakers can maintain starters at various hydration levels. A 100% hydration starter, often called a liquid starter, is a popular choice because it is easy to mix, and the math is straightforward to calculate. A 100% hydration means that the weight of the water is equal to the weight of the flour.
Stiff starters, on the other hand, have a lower hydration level, typically between 50% and 65%. In this circumstance, the weight of the water is less than the weight of the flour.
To calculate your starter's hydration percentage, divide the water weight by the flour weight and then multiply by 100.
Here are some examples:
- A starter fed 40g flour and 40g water:
40 (water) / 40 (flour) = 1 x 100 = 100% hydration level
- A starter fed with 40g flour and 24g water:
24 (water) / 40 (flour) = 0.6 x 100 = 60% hydration level
Understanding the difference between a sourdough starter and a levain can be confusing, as terms are often used interchangeably in sourdough baking.
A sourdough starter, sometimes referred to as the "mother," is a long-term culture of wild yeasts and bacteria regularly fed to sustain the microbes. It is a perpetual culture maintained over time. It kickstarts fermentation in dough and is the backbone of sourdough baking.
A levain, on the other hand, is a prepared offshoot of the starter crafted for a specific bake. While it shares the same basic composition as the starter, it's often customized for the needs of a particular recipe through adjustments in flour type, feeding ratio, or fermentation conditions, allowing for more control over the bread's flavor and texture. Essentially, a levain is a temporary, recipe-focused culture.
Not all recipes require a levain. However, when a recipe specifies a levain, it will include precise instructions for its creation to achieve the desired outcome. The choice between using a levain and a starter often depends on the baker's preference and the specific requirements of the bread being made. If you typically maintain a minimal amount of starter and then build it up specifically for baking, this process essentially creates a levain.
In practice, a ripe starter can often substitute for a levain, which may slightly alter the recipe's final result. For instance, if a levain calls for a particular flour, like spelt or whole wheat, and your starter uses white bread flour, the bread's flavor, and texture might differ from the original intention.
The frequency of feeding your sourdough starter depends on its age and your baking schedule. For starters less than a month old, daily feedings are crucial. This routine helps establish a strong culture of beneficial microbes and ensures they outcompete any unwanted organisms.
Once your starter matures, you can reduce feeding frequency. Slowing the fermentation rate is the key to feeding less frequently while still maintaining a healthy culture. This approach prevents overripening between feedings, a common issue for starters kept at room temperature without daily refreshments.
There are two main adjustments you can make to slow the rate of fermentation:
- Cooler Temperatures: Store your starter in a cooler environment. The Sourdough Home is particularly effective for this purpose.
- Adjust Seed Ratio: Increase the ratio of flour and water during feedings. More food means the microbes take longer to exhaust their food supply. For example, if you normally use a 1:1:1 ratio, try switching to a 1:4:4 or even a 1:8:8.
Additionally, the type of flour used will affect the fermentation rate. Incorporating some whole grain flour, like rye or whole wheat, into your starter's feed can invigorate fermentation activity due to the increased nutrient content, leading to a quicker rise. Conversely, using all-purpose or white flour can slow down the process.
These strategies can be used alone or in combination to suit your schedule and starter health, allowing for more flexibility in sourdough baking.
Choosing the best environment for your sourdough starter—either the Sourdough Home or the Folding Proofer—depends on your specific baking needs, the climate you live in, and how you prefer to manage fermentation.
The Sourdough Home:
- Degree-by-degree temperature setpoints ranging from 5-50°C (41-122°F), providing wide-ranging temperature control.
- Unique in its ability to both heat and cool, offering more control over the starter's activity level. This is especially advantageous in warmer climates or seasons, where the cooling function can slow down fermentation—ideal for extending the time between feedings without compromising the starter's health. It’s also ideal for maintaining starters with specific temperature needs, like pasta madre.
- Designed specifically for sourdough starters, it fits up to a 1-liter/1-quart jar, focusing on smaller-scale fermentation.
The Folding Proofer:
- Offers a warm environment with a temperature range of 21 - 49°C (70 - 120°F), making it perfect for cooler climates by ensuring consistent fermentation for both starter and dough.
- Lacking the ability to cool, it offers a different control over fermentation speed than the Sourdough Home, but it makes up for this with its larger capacity. This allows it to accommodate a variety of containers, including mixing bowls and bread pans, and even enables simultaneous proofing of dough and starter—ideal for multitasking bakers.
In essence, the Sourdough Home provides a consistent temperature for your starter, year-round, no matter the season. Conversely, the Folding Proofer excels at providing a warm environment for larger quantities or multiple items at once, but it does not offer the ability to cool.
Many bakers find it beneficial to use the Sourdough Home for maintaining their starter and the Folding Proofer for proofing their bread dough, leveraging the strengths of both devices to optimize their sourdough baking process.


